How to Fit to Page in Excel (Print on One Sheet)

Picture this – you’ve worked hard to get your spreadsheet to look just right.
You’ve sized the columns correctly, you’ve put nice colored headings, and everything looks great on the screen.
And now when you hit that Print button, it doesn’t work as you expected!
Your last 2 columns are appearing on the second page and you’re not sure where most of your rows have gone!
Unlike Microsoft Word, printing Excel worksheets is surprisingly not as intuitive as you would think.
This is because your spreadsheets are not always sized the same.
So it’s no surprise if you find your columns splitting in the most awkward places or if you find few rows on one page and few on the others.
You might also find it difficult to control the size of the text in your printout.
Fortunately, there are ways around this.
In this tutorial, you’ll see two ways to fit your Excel data (rows and columns) into one page.
I will also point out certain issues you are likely to face while printing and how to solve them.
Table of Contents
Method 1: Fitting data to Page in Excel using Page Setup
Below are the steps to scale the data in the worksheet to fit on one page:
- From the Page Layout tab, you will find the ‘Scale to Fit’ group. This lets you adjust the width and height of your printout to fit a certain number of pages.
- If you want your whole worksheet to be printed on exactly one sheet of paper, set Width and Height both to “1 page” by selecting it from the dropdown menu.
- Check how your printout is going to look by navigating to File->Print. If everything went right, you should see all your data fit into a single page.

When you use this option to scale the page and fit data on one page, it will make the data look small (as Excel tries to squeeze more data in the same space. This works fine if you only have a few extra rows or columns, but if you have a lot, fitting all of it in one page may not be a good idea.
Method 2: Fitting data to Page in Excel using Print Preview Screen
You can also scale the data to fit on one page while you’re printing the data.
This does exactly the same thing that I did in the previous method (just the option to do it is in a different place).
Below are the steps to fit data on one page while printing:
- Click the File tab
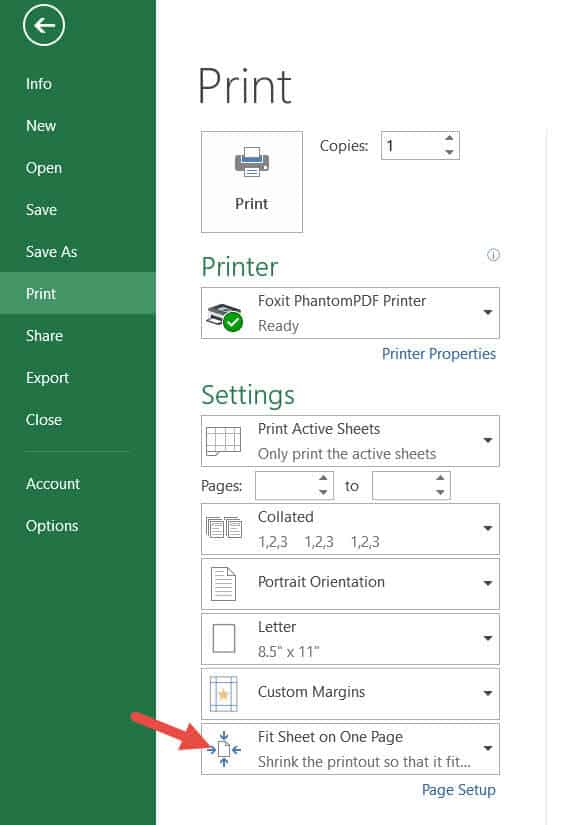
- Click on the Print option. This will open the Print Preview screen.
- On the left-hand side of the screen, you will see a ‘Settings’ section. The last option under this section is most likely a dropdown that says “No Scaling”. Select the arrow for this dropdown.
- Select “Fit Sheet on One Page”
- Check if you got everything on a single page from the preview on the right-hand side of the screen. If everything looks fine, you can go ahead and hit the Print button.
Autofit only the Width or Height into a Single Page
If you have too much data in too many columns, your printout might turn out too tiny and look illegible. There are ways around this.
- If you need all your columns within 1 page, but don’t mind splitting the rows to 2, 3, or how many ever pages needed, then leave the Height option blank if using the first method. If using the second method, select “Fit all Columns on One Page” instead of “Fit Sheet on One Page”.
- Similarly, if you want all your rows to fit in a single page and don’t mind columns spanning separate pages, then leave the Width option blank if using the first method. If using the second method, select “Fit all Rows on One Page”.
Another option is to use page breaks to divide your worksheet.
Using Page Breaks to divide your Worksheet’s Print Areas
Page Breaks are dividers that specify the areas where your sheet will break into separate pages when printed.
Excel automatically adds page breaks, unless you specify them yourself.
It fixes these page breaks depending on your page size, margins, and scale options to ensure that an optimal number of columns and rows appear on each page.
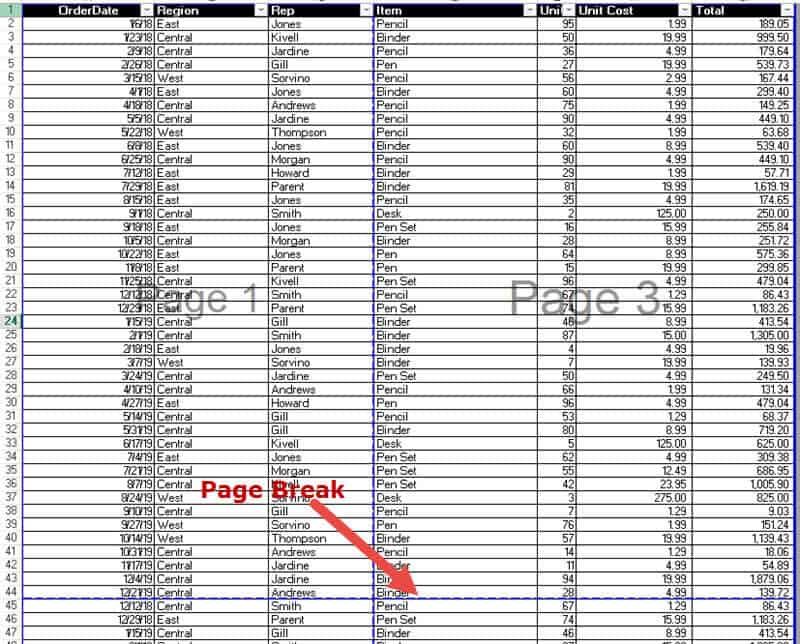
- To see the page breaks, (indicated by a dashed line), select ‘Page Break View’ from the View tab (Under the ‘Workbook Views’ group).
- You will see the page break demarcations in the form of blue dashed lines. You can now move these dashed lines to accommodate the number of rows and columns you need to fit in one page.
- To return to Normal view, just select ‘Normal’ from the View Tab. Make sure to preview the pages before printing.
If you have selected the ‘Fit Sheet on One Page’ from the Print Settings area, you will not be able to set the page breaks (as Excel already knows it needs to fit all the data in one sheet). If you want to set the page breaks, then you need to go to the Print settings (click on File >> Print >> Settings) and select ‘No Scaling’ from the last drop-down.
Points to Remember when Printing Your Worksheet
- Excel lets you select a portion of your worksheet that you want to print solely on a single page. For this, select the area that you want to print on one page. Then, select Print Area from the Page Layout tab, under the ‘Page Setup’ group. From the dropdown menu that appears, select ‘Set Print Area’. If you see the print preview now, you will see only your selected area ready to print on your page. To clear your selected print area, just select ‘Clear Print Area’.
- If you find your selected area is too small or too large for the page, you can shrink or enlarge it as needed. For this, select the Dialog box launcher ( ) from the ‘Scale to Fit’ group under the Page Layout tab. This will open the Page Setup dialog box. Under the ‘Scaling’ section, select the radio button next to ‘Adjust to’ and set percentage to the size you want. If you want to enlarge your selected area to fit the page, then select a number more than 100%. If you want to shrink it to fit the page, then select a number less than 100%.
- If your sheet has quite a lot of columns, it may be wiser to change the page orientation and print your sheet in Landscape mode, rather than Portrait. For this, navigate to the Page Setup dialog box and select the radio button next to the Landscape option (under the Orientation section).
- The default paper size setting is usually ‘Letter (8.5” x 11”)’. If you are using a different sized paper, you can change the paper size settings from the Page Setup dialog box. Under the Scaling section, next to ‘Paper size’, click on the dropdown arrow and select the appropriate paper size from the list.
In this tutorial, I showed you two ways to fit your worksheet into one page.
We have also provided some tips to not just fit your sheet to a page, but to do so in such a way that your printout is legible and looks elegant. I hope you found this tutorial helpful.
Other Excel tutorials you may find useful:
- How to Print Multiple Tabs/Sheets in Excel
- How to Set a Row to Print on Every Page in Excel
- How to Center the Worksheet Horizontally on the Page in Excel
- How to Make all Cells the Same Size in Excel (AutoFit Rows/Columns)
- How to Print Row Numbers in Excel
- How to Print Gridlines in Excel
I am a huge fan of Microsoft Excel and love sharing my knowledge through articles and tutorials. I work as a business analyst and use Microsoft Excel extensively in my daily tasks. My aim is to help you unleash the full potential of Excel and become a data-slaying wizard yourself.
1 thought on “How to Fit to Page in Excel (Print on One Sheet)”
Naomi Grant
Hi Steve Thank you, I really found this tutorial helpful. I am going to try it out now. Regards Naomi Reply
Leave a Comment Cancel reply
MOST POPULAR ARTICLES
spreadsheetplanet.com is a participant in the Amazon Services LLC Associates Program, an affiliate advertising program designed to provide a means for sites to earn advertising fees by advertising and linking to Amazon.com
